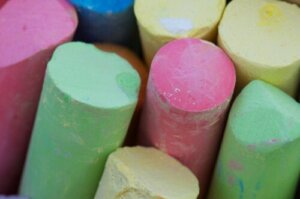
How to Make Colored Chalk

Written and verified by the teacher Samanta Ruiz
Today we bring you a fun plan for an afternoon at home with the kids: We’ll explain how to make colored chalk, a very easy, economical, and creative craft.
When the cold evenings arrive and your bodies ask to stay indoors, it’s a good idea to find fun alternatives to entertain the kids. In this sense, UNICEF has developed an interesting activity guide in order to “promote and facilitate the mental development, creativity, and motor skills of children and adolescents, particularly when physical activity options are limited”.
Therefore, we’re going to plan a craft that’s made with few elements, but that offers a lot of fun. Besides being attractive, this idea is a great way to accompany children in their integral development, as it promotes the learning of motor skills and reinforces emotional and cognitive aspects. Let’s get to work!
The benefits of making your own colored chalk
Making homemade chalk is a craft that serves as a leisure plan, as a game, and as a learning activity. Like any craft activity, it provides multiple benefits for children:
- Stimulates creativity: children can choose chalk shapes and make different models and colors to have their personal collection.
- Promotes the development of fine motor skills: stirring, kneading, filling molds, cutting, and unmolding are activities that strengthen their little hands and help them learn to coordinate to achieve the best results.
- Provides new knowledge: when you help your children make colored chalk, it gives you the opportunity to explain complex concepts of chemistry and art to the little ones. You’ll also touch on mathematics, as they’ll have to measure quantities.
- Exercises the memory: reading the step-by-step instructions and remembering them is a challenge that trains the memory.
- Activates the imagination: children can make molds with the figures they want and make colored chalk that’s large, small, round, triangular, or whatever shape they can think of.
- Produces a relaxed atmosphere for laughing, sharing, and socializing: crafts, like art, create moments of relaxation in which children have fun and share spontaneously.
- It allows children to express feelings and emotions: having colored chalks to draw and color can be a great opportunity for the child to materialize their thoughts in a figure or a color.
- It teaches kids to plan and to bring a project to fruition: having the elements for the craft, having the necessary tools, making a plan, and following the instructions helps children to organize themselves to reach a goal.
- It supports children in building their self-confidence and self-esteem: setting a goal, following an idea, and completing a project build confidence in one’s own abilities.

How to make colored chalk with your children
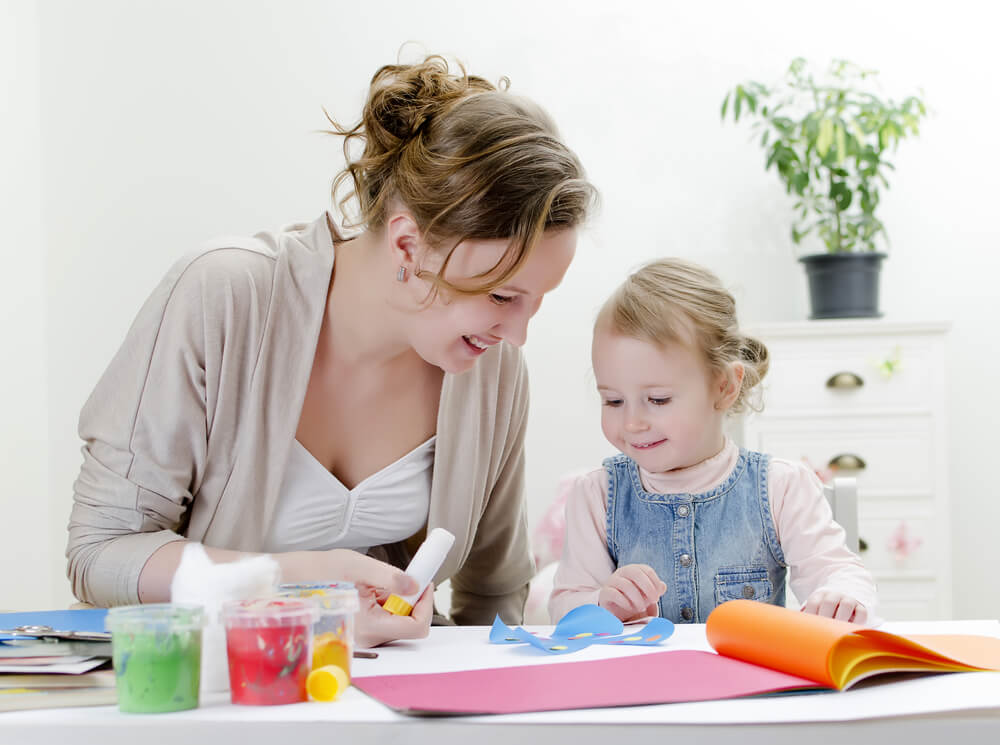
The good thing about this activity is that it can be done by children of any age and everyone will be equally fascinated by it. Mostly, they need to be willing to get messy and have fun at the same time.
Materials
- Fine plaster or plaster of Paris (comes in containers of different sizes)
- Water
- Food coloring or colored tempera
- Molds (silicone, disposable cups, or cardboard tubes)
- Mixing bowl
- Spoon
- Smooth spatula
How to do it: Step-by-step instructions to make colored chalk
- Read the instructions on the plaster package and prepare the necessary quantities of water and the main material in separate containers.
- Before you start mixing, define how many colors you’re going to make.
- Color the water with the shades of your choice. If you want several options, you have to prepare them in separate containers.
- Add the plaster to the colored water little by little, in general, with a 1 to 1 ratio, that is, 1 cup of material in 1 cup of water.
- Combine the materials well until you have a homogeneous consistency like that of ice cream.
- Spoon the colored mixture into the molds you’ve chosen.
- Remove the excess with a spatula.
- Let dry for at least 24 hours.
- The next day, carefully remove from the molds.
- You now have your own chalks to paint and draw!
Making homemade chalk: A combination of chemistry, craft, and art
As you’ve seen, it’s very easy to make colored chalk, and the materials you need for this are very cheap. In addition to having fun with the kids, with this activity you can take advantage to teach them the following notions:
- Chemistry: such as dissolution and solidification.
- Physics of materials: with their hands, children explore different textures and consistencies, while molding to their liking.
- Art: by imagining, drawing, and painting, they let their creative brains fly.
Finally, remember that spending quality time with children is one of the most comforting things for families. Doing fun things and living experiences together is the best way to produce memories of happiness, love, and harmony that will last forever.
Today we bring you a fun plan for an afternoon at home with the kids: We’ll explain how to make colored chalk, a very easy, economical, and creative craft.
When the cold evenings arrive and your bodies ask to stay indoors, it’s a good idea to find fun alternatives to entertain the kids. In this sense, UNICEF has developed an interesting activity guide in order to “promote and facilitate the mental development, creativity, and motor skills of children and adolescents, particularly when physical activity options are limited”.
Therefore, we’re going to plan a craft that’s made with few elements, but that offers a lot of fun. Besides being attractive, this idea is a great way to accompany children in their integral development, as it promotes the learning of motor skills and reinforces emotional and cognitive aspects. Let’s get to work!
The benefits of making your own colored chalk
Making homemade chalk is a craft that serves as a leisure plan, as a game, and as a learning activity. Like any craft activity, it provides multiple benefits for children:
- Stimulates creativity: children can choose chalk shapes and make different models and colors to have their personal collection.
- Promotes the development of fine motor skills: stirring, kneading, filling molds, cutting, and unmolding are activities that strengthen their little hands and help them learn to coordinate to achieve the best results.
- Provides new knowledge: when you help your children make colored chalk, it gives you the opportunity to explain complex concepts of chemistry and art to the little ones. You’ll also touch on mathematics, as they’ll have to measure quantities.
- Exercises the memory: reading the step-by-step instructions and remembering them is a challenge that trains the memory.
- Activates the imagination: children can make molds with the figures they want and make colored chalk that’s large, small, round, triangular, or whatever shape they can think of.
- Produces a relaxed atmosphere for laughing, sharing, and socializing: crafts, like art, create moments of relaxation in which children have fun and share spontaneously.
- It allows children to express feelings and emotions: having colored chalks to draw and color can be a great opportunity for the child to materialize their thoughts in a figure or a color.
- It teaches kids to plan and to bring a project to fruition: having the elements for the craft, having the necessary tools, making a plan, and following the instructions helps children to organize themselves to reach a goal.
- It supports children in building their self-confidence and self-esteem: setting a goal, following an idea, and completing a project build confidence in one’s own abilities.
How to make colored chalk with your children
The good thing about this activity is that it can be done by children of any age and everyone will be equally fascinated by it. Mostly, they need to be willing to get messy and have fun at the same time.
Materials
- Fine plaster or plaster of Paris (comes in containers of different sizes)
- Water
- Food coloring or colored tempera
- Molds (silicone, disposable cups, or cardboard tubes)
- Mixing bowl
- Spoon
- Smooth spatula
How to do it: Step-by-step instructions to make colored chalk
- Read the instructions on the plaster package and prepare the necessary quantities of water and the main material in separate containers.
- Before you start mixing, define how many colors you’re going to make.
- Color the water with the shades of your choice. If you want several options, you have to prepare them in separate containers.
- Add the plaster to the colored water little by little, in general, with a 1 to 1 ratio, that is, 1 cup of material in 1 cup of water.
- Combine the materials well until you have a homogeneous consistency like that of ice cream.
- Spoon the colored mixture into the molds you’ve chosen.
- Remove the excess with a spatula.
- Let dry for at least 24 hours.
- The next day, carefully remove from the molds.
- You now have your own chalks to paint and draw!
Making homemade chalk: A combination of chemistry, craft, and art
As you’ve seen, it’s very easy to make colored chalk, and the materials you need for this are very cheap. In addition to having fun with the kids, with this activity you can take advantage to teach them the following notions:
- Chemistry: such as dissolution and solidification.
- Physics of materials: with their hands, children explore different textures and consistencies, while molding to their liking.
- Art: by imagining, drawing, and painting, they let their creative brains fly.
Finally, remember that spending quality time with children is one of the most comforting things for families. Doing fun things and living experiences together is the best way to produce memories of happiness, love, and harmony that will last forever.
All cited sources were thoroughly reviewed by our team to ensure their quality, reliability, currency, and validity. The bibliography of this article was considered reliable and of academic or scientific accuracy.
- Kaneshiro, N. MD (Revisión 2021) Control de la motricidad fina. Biblioteca Nacional de Medicina. Estados Unidos. Disponible en: https://medlineplus.gov/spanish/ency/article/002364.htm
- Santoyo, S. (2020). 10 beneficios de las manualidades para niños. Aula Planeta. Recuperado de: https://www.aulaplaneta.com/2020/10/15/firmas-invitadas/10-beneficios-de-las-manualidades-para-los-ninos/
- UNICEF (2020) ¡A divertirse en casa! Fondo de las Naciones Unidas para la Infancia. Disponible en: https://www.unicef.org/lac/media/11131/file/A-divertirse-en-casa.pdf
This text is provided for informational purposes only and does not replace consultation with a professional. If in doubt, consult your specialist.