2 Photo Arts and Crafts Projects for Children

Arts and crafts projects are one of the best ways to entertain and stimulate children’s creativity. Any weekend, holiday or school break is an excellent time to do photo arts and crafts projects for children. Therefore, in this article, we’ll take the opportunity to offer some options.
As you’ll observe, to do the photo art and crafts projects we’ll share here, you won’t need to make an exorbitant financial investment or be a specialist in this type of activity. They’re very simple to do and, in fact, you may have most of the materials at your disposal. Read on to discover our options!
The best photo arts and crafts projects for children
1. A Christmas tree
Christmas is a special time for children because, besides good food and sweets, children are also excited about Christmas decorations and fascinated by the Christmas tree.
Although decorating the tree is fun, sometimes it’s hard to keep children away from the ornaments and other fragile decorative elements. In addition, many of them find it especially fun to remove and replace ornaments. For this reason, we propose creating a Christmas tree with card stock your children will be able to decorate with the photos they choose.
As for tools and materials, you’ll need:
- Green card stock for the tree, brown card stock for the tree trunk, and yellow card stock for the star.
- Double-sided tape.
- Photos of loved ones and pets.
- Scissors.
- Glue.
Steps to follow
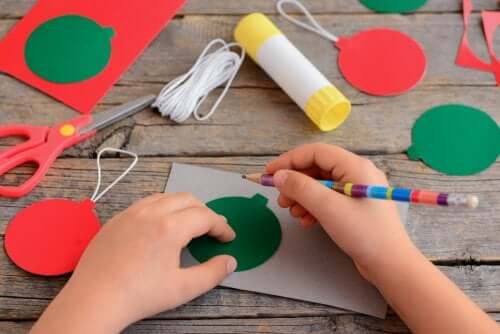
To start, draw a tree on the green card stock and a tree trunk on the brown card stock. Then, help your children cut the tree and the tree trunk along the lines. Glue the tree trunk to the tree and cut a star on yellow card stock to decorate the top of the tree.
Then, take your children’s photos and draw circles on the back of them, making sure that the main subject is in the circle. These pictures will serve as the Christmas ball ornaments. If you want to be a little more original, you can also cut your photos into other shapes, such as stars or bells.
After that, cut the photos along the lines. If you want your Christmas ball ornaments to be stronger and not bend, you can paste your photos on card stock. Place the Christmas ball ornaments in front of the Christmas tree.
Then, cut small pieces of double-sided tape. Place one on the back of the Christmas ball ornament and another on the Christmas tree. Finally, all you have to do is place the Christmas ball ornaments on your tree. You can modify and change the design to your liking!
2. Embroidered cards, one of the photo arts and crafts projects for children
This second proposal we offer is very original. It consists of creating beautiful cards with drawings and holes that children can embroider themselves. This project is often very popular among children. The tools and materials you’ll need are:
- Family or pet photos with lines and contours that fit well with the embroidery.
- Colored cardboard to glue the photos.
- Glue.
- Thick sewing needles.
- Scissors.
- Felts and feathers.
- Wool.

Steps to follow
To begin, help your children glue the photos on the cardboard to make them thicker and stiffer. Use enough glue on the edges so they won’t peel off. Cut the cardboard around the edges so the photos don’t stick out.
Then, draw patterns or shapes in the photos with a pencil with your child. We recommend that you only draw points and not the solid lines. You can follow the existing lines in each photo, such as the contours of a cloud, or create shapes that don’t exist yet in your photos, such as a heart or a star.
Use the needle to make holes in the photos, following the markings. Slightly rotate the needle in both directions to make the holes bigger. This is important so that the wool passes through the holes.
Finally, you can start embroidering photographic cards. You can place them in your child’s room or on the refrigerator.
Finally, don’t forget that the photo arts and crafts projects for children presented here are very simple to do. So we believe you’ll have a great time doing them with your children! What are you waiting for to start?
Arts and crafts projects are one of the best ways to entertain and stimulate children’s creativity. Any weekend, holiday or school break is an excellent time to do photo arts and crafts projects for children. Therefore, in this article, we’ll take the opportunity to offer some options.
As you’ll observe, to do the photo art and crafts projects we’ll share here, you won’t need to make an exorbitant financial investment or be a specialist in this type of activity. They’re very simple to do and, in fact, you may have most of the materials at your disposal. Read on to discover our options!
The best photo arts and crafts projects for children
1. A Christmas tree
Christmas is a special time for children because, besides good food and sweets, children are also excited about Christmas decorations and fascinated by the Christmas tree.
Although decorating the tree is fun, sometimes it’s hard to keep children away from the ornaments and other fragile decorative elements. In addition, many of them find it especially fun to remove and replace ornaments. For this reason, we propose creating a Christmas tree with card stock your children will be able to decorate with the photos they choose.
As for tools and materials, you’ll need:
- Green card stock for the tree, brown card stock for the tree trunk, and yellow card stock for the star.
- Double-sided tape.
- Photos of loved ones and pets.
- Scissors.
- Glue.
Steps to follow
To start, draw a tree on the green card stock and a tree trunk on the brown card stock. Then, help your children cut the tree and the tree trunk along the lines. Glue the tree trunk to the tree and cut a star on yellow card stock to decorate the top of the tree.
Then, take your children’s photos and draw circles on the back of them, making sure that the main subject is in the circle. These pictures will serve as the Christmas ball ornaments. If you want to be a little more original, you can also cut your photos into other shapes, such as stars or bells.
After that, cut the photos along the lines. If you want your Christmas ball ornaments to be stronger and not bend, you can paste your photos on card stock. Place the Christmas ball ornaments in front of the Christmas tree.
Then, cut small pieces of double-sided tape. Place one on the back of the Christmas ball ornament and another on the Christmas tree. Finally, all you have to do is place the Christmas ball ornaments on your tree. You can modify and change the design to your liking!
2. Embroidered cards, one of the photo arts and crafts projects for children
This second proposal we offer is very original. It consists of creating beautiful cards with drawings and holes that children can embroider themselves. This project is often very popular among children. The tools and materials you’ll need are:
- Family or pet photos with lines and contours that fit well with the embroidery.
- Colored cardboard to glue the photos.
- Glue.
- Thick sewing needles.
- Scissors.
- Felts and feathers.
- Wool.
Steps to follow
To begin, help your children glue the photos on the cardboard to make them thicker and stiffer. Use enough glue on the edges so they won’t peel off. Cut the cardboard around the edges so the photos don’t stick out.
Then, draw patterns or shapes in the photos with a pencil with your child. We recommend that you only draw points and not the solid lines. You can follow the existing lines in each photo, such as the contours of a cloud, or create shapes that don’t exist yet in your photos, such as a heart or a star.
Use the needle to make holes in the photos, following the markings. Slightly rotate the needle in both directions to make the holes bigger. This is important so that the wool passes through the holes.
Finally, you can start embroidering photographic cards. You can place them in your child’s room or on the refrigerator.
Finally, don’t forget that the photo arts and crafts projects for children presented here are very simple to do. So we believe you’ll have a great time doing them with your children! What are you waiting for to start?
This text is provided for informational purposes only and does not replace consultation with a professional. If in doubt, consult your specialist.