3 Crafts About the Seasons of the Year
One of the ways we see time passing is by observing our natural surroundings and environment. With crafts about the seasons of the year, we can embrace each season’s distinct features, from the leaves of fall to the sun of summer. These creative activities for kids will also help them learn motor skills.
What should be in crafts about the seasons?
The four seasons of the year are different, and each one has different characteristics that you can use to make crafts. Some of the things that you can use to represent the different times of the year are:
- Summer: heat, sun, long days, beach, fruits
- Autumn: wind, brown leaves, clouds
- Winter: snow, cold, short days, leafless trees
- Spring: flowers, green trees, bees, birds singing
These are just the basics, but you can add other themes. Next, we’ll show you 3 simple and very easy crafts about the seasons of the year. You can try these suggestions and use your imagination!
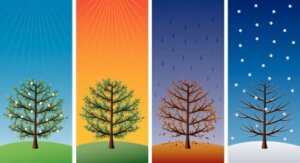
Seasons tree
This DIY craft is very useful to explain the changing of the seasons to the little ones. You’ll need these materials:
- Cardboard
- Colored pencils
- Glue
- Scissors
- Colored tissue paper
Directions:
- Draw four equal trees on the cardboard.
- Then, paint the trees in different colors: you can use blue or gray for winter, green for spring, red or yellow for summer, and brown or orange for fall.
- Cut out the trees.
- Next, mark a center line through the trunk and fold the cardboard.
- Glue the trees on the other side, matching up the middle line and the middle of the leaf of each one. You’ll have a tree model with four faces.
- Then, decorate each face with pieces of tissue paper representing fruits, flowers, snowflakes, branches, leaves, etc.
- The finished model is a standing tree with one face for each season. It’s a good idea to glue it to cardboard and write the name of the season on each side represents.
4. Seasons game
To make this game, you need the following materials:
- 16 flat and clear stones, which you can find on a trail or on the beach
- Black pencil
- Eraser
- Colored markers
- Black marker
- Acrylic varnish
- Ruler
- White cardboard
Directions:
- First, wash the stones very well.
- Divide the stones into 4 groups of 4, one for each season.
- Draw something that represents each one with a pencil. For example, for the 4 stones of the spring, draw flowers, a rainbow, a butterfly, and a bird.
- Next, outline the drawings with a black marker.
- Then, paint the stones with the clear acrylic varnish to make the drawings last longer.
- Cut a square of cardboard measuring 20 x 20 inches. Mark it with a marker in the middle, both horizontally and vertically, so you have 4 equal squares.
- Paint each space with a color that corresponds to the season and write the name: spring, summer, autumn and winter.
To play, place the stones around the board and have the children place them in their correct boxes. This is a great way for them to learn the differences between the seasons of the year.
Table of the 4 seasons
This is a great craft to unleash children’s creativity and artistic side, and you can even hang it in their room or a classroom. To do it, you need the following materials:
- Sheet of cardboard
- White and colored paper
- Black pencil
- Tempera paint, markers and colored pencils
- Glue
- Pair of scissors
- Extra: cotton, beads, etc.

Directions:
- Cut the cardboard into a square, in the size of your choice.
- Divide it into 4 equal squares. Each one will be one season.
- Cut 4 white cards to the size of each of those spaces.
- On the white cardboard, draw, color or glue different elements of each season to form a collage of images. Inspiration is free!
- Glue 4 cards onto the cardboard in the appropriate order.
- It’s fun to add elements to the drawings, like strips of paper representing rain, or cotton balls for snowflakes. You can also add flower petals or twigs.
Combine science and art in crafts about the seasons of the year
Using different elements is part of the future of education, and with these crafts about the seasons of the year, you’ll be taking a step in that direction. You’ll be combining DIY crafts with basic science concepts, and they’re both important for children to learn.
One of the ways we see time passing is by observing our natural surroundings and environment. With crafts about the seasons of the year, we can embrace each season’s distinct features, from the leaves of fall to the sun of summer. These creative activities for kids will also help them learn motor skills.
What should be in crafts about the seasons?
The four seasons of the year are different, and each one has different characteristics that you can use to make crafts. Some of the things that you can use to represent the different times of the year are:
- Summer: heat, sun, long days, beach, fruits
- Autumn: wind, brown leaves, clouds
- Winter: snow, cold, short days, leafless trees
- Spring: flowers, green trees, bees, birds singing
These are just the basics, but you can add other themes. Next, we’ll show you 3 simple and very easy crafts about the seasons of the year. You can try these suggestions and use your imagination!
Seasons tree
This DIY craft is very useful to explain the changing of the seasons to the little ones. You’ll need these materials:
- Cardboard
- Colored pencils
- Glue
- Scissors
- Colored tissue paper
Directions:
- Draw four equal trees on the cardboard.
- Then, paint the trees in different colors: you can use blue or gray for winter, green for spring, red or yellow for summer, and brown or orange for fall.
- Cut out the trees.
- Next, mark a center line through the trunk and fold the cardboard.
- Glue the trees on the other side, matching up the middle line and the middle of the leaf of each one. You’ll have a tree model with four faces.
- Then, decorate each face with pieces of tissue paper representing fruits, flowers, snowflakes, branches, leaves, etc.
- The finished model is a standing tree with one face for each season. It’s a good idea to glue it to cardboard and write the name of the season on each side represents.
4. Seasons game
To make this game, you need the following materials:
- 16 flat and clear stones, which you can find on a trail or on the beach
- Black pencil
- Eraser
- Colored markers
- Black marker
- Acrylic varnish
- Ruler
- White cardboard
Directions:
- First, wash the stones very well.
- Divide the stones into 4 groups of 4, one for each season.
- Draw something that represents each one with a pencil. For example, for the 4 stones of the spring, draw flowers, a rainbow, a butterfly, and a bird.
- Next, outline the drawings with a black marker.
- Then, paint the stones with the clear acrylic varnish to make the drawings last longer.
- Cut a square of cardboard measuring 20 x 20 inches. Mark it with a marker in the middle, both horizontally and vertically, so you have 4 equal squares.
- Paint each space with a color that corresponds to the season and write the name: spring, summer, autumn and winter.
To play, place the stones around the board and have the children place them in their correct boxes. This is a great way for them to learn the differences between the seasons of the year.
Table of the 4 seasons
This is a great craft to unleash children’s creativity and artistic side, and you can even hang it in their room or a classroom. To do it, you need the following materials:
- Sheet of cardboard
- White and colored paper
- Black pencil
- Tempera paint, markers and colored pencils
- Glue
- Pair of scissors
- Extra: cotton, beads, etc.
Directions:
- Cut the cardboard into a square, in the size of your choice.
- Divide it into 4 equal squares. Each one will be one season.
- Cut 4 white cards to the size of each of those spaces.
- On the white cardboard, draw, color or glue different elements of each season to form a collage of images. Inspiration is free!
- Glue 4 cards onto the cardboard in the appropriate order.
- It’s fun to add elements to the drawings, like strips of paper representing rain, or cotton balls for snowflakes. You can also add flower petals or twigs.
Combine science and art in crafts about the seasons of the year
Using different elements is part of the future of education, and with these crafts about the seasons of the year, you’ll be taking a step in that direction. You’ll be combining DIY crafts with basic science concepts, and they’re both important for children to learn.
All cited sources were thoroughly reviewed by our team to ensure their quality, reliability, currency, and validity. The bibliography of this article was considered reliable and of academic or scientific accuracy.
- La educación STEAM y la cultura «maker»: https://dialnet.unirioja.es/servlet/articulo?codigo=7048347
- JUNTA DE ANDALUCIA: http://www.juntadeandalucia.es/educacion/descargasrecursos/plc/html/primaria/cuatroest-anexo1.pdf
This text is provided for informational purposes only and does not replace consultation with a professional. If in doubt, consult your specialist.