Christmas Crafts to Make at Home with Your Family

Christmas is one of the most magical times of the year. Excitement, songs, and lights come together year after year to celebrate this beautiful holiday. One of the things that signals the arrival of Christmas is decoration. When streets, houses, gardens, and stores are filled with lights and trees… that means Christmas is coming! That’s why today, we’re bringing you a series of Christmas crafts that you can enjoy making with the whole family at home.
You can even use these crafts in school, and let classmates begin decorating their classrooms with a holiday touch.
Christmas crafts for the whole family to make together
Christmas characters made with cardboard
Santa Claus, the Three Wise Kings, reindeers, and snowmen are the protagonists on Christmas. Making these characters will be super easy if you use toilet paper rolls as a base. Besides, by doing this, you’ll also be recycling material. For example, to make a Santa Claus, you’ll need:
- A cardboard roll
- Cotton
- Red paperboard
- Glue
- Scissors
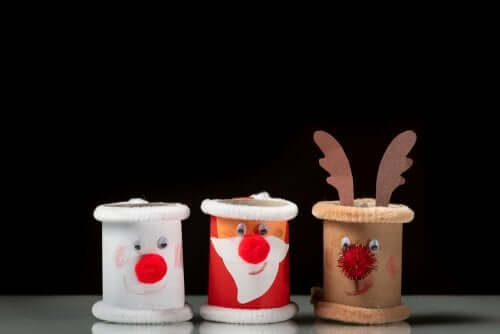
Use the red paperboard to wrap the outer half of the cylinder, creating Santa Claus’ clothes. You should also use this paperboard to create this character’s hat. To do so, all you need to do is create a cone and put a small cotton ball on its tip.
At the upper part of the cylinder — the part with no decorations — add some cotton, recreating Santa Claus’ white beard and hair. Leave a space in the middle of the cylinder so that you can draw his nose and eyes. Our Santa Claus is ready!
In the same way, you can create other types of characters that show their own characteristics. All you’ll need is your own imagination.
Christmas bubbles to decorate the tree
As we said before, one of the hallmarks of Christmas are trees. These trees are set up in homes and streets, fully decorated with several colors and forms.
Undoubtedly, the most important complement of a Christmas tree is its ornaments. So, here we show you how to create Christmas ball ornaments to decorate the tree. You will need:
- Paperboard
- EVA foam
- Pencil
- Scissors
- Ribbon
The first step will be to draw, or trace, the ornament’s form on the paperboard of your choice. Once the shape has been cut out, the next step will be to decorate it. You can use EVA foam or any other similar material that you have at home. For the decoration, you can make snowflakes, stars or presents in whichever way you prefer,
Lastly, make a tiny hole in the upper part of the ornament so that the ribbon can get through it and the ornament can hang from the Christmas tree.
A Christmas tree
Most children love to help put up Christmas decorations — especially tree decorations. For that reason, they’ll love to create their own Christmas tree in a very simple way. To do so, they’ll need the following materials:
- Three ice cream sticks
- Colored buttons of the same size
- A brown paperboard
The first step will be to paint the three ice cream sticks green. Once painted, glue them together so that they form a triangle — simulating the form of a Christmas tree.
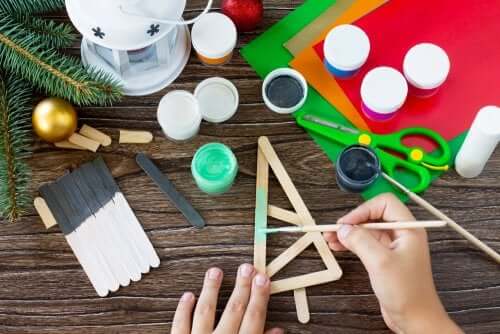
The buttons should be placed on the sticks, giving them a nice touch. If you don’t have that many buttons of different colors, you can use small circles made out of paperboard.
Lastly, since every tree needs its base, cut out a small rectangle from the brown paperboard and glue it at the back of the horizontal ice cream stick.
Santa Claus’ reindeer, one of the best Christmas crafts
To create a Santa Claus’ reindeer you’ll need the following materials:
- A plastic plate
- Brown paperboard
- Brown paint in acrylic
- Two ice cream sticks
- Two googly eyes
- A red pom-pom
The first step will be to paint the plastic plate brown. You should paint the part with the base, that is, the part that rests at the table and not the part on which you put the food. Once painted, the next step will be to glue the eyes and red pom-pom, which will be the nose.
With brown paperboard, you should create two tiny ears that will be set at the sides of the plate. Lastly, two ice-cream sticks, also painted brown, should be placed on top of the ears, simulating the reindeer’s antlers.
Christmas is one of the most magical times of the year. Excitement, songs, and lights come together year after year to celebrate this beautiful holiday. One of the things that signals the arrival of Christmas is decoration. When streets, houses, gardens, and stores are filled with lights and trees… that means Christmas is coming! That’s why today, we’re bringing you a series of Christmas crafts that you can enjoy making with the whole family at home.
You can even use these crafts in school, and let classmates begin decorating their classrooms with a holiday touch.
Christmas crafts for the whole family to make together
Christmas characters made with cardboard
Santa Claus, the Three Wise Kings, reindeers, and snowmen are the protagonists on Christmas. Making these characters will be super easy if you use toilet paper rolls as a base. Besides, by doing this, you’ll also be recycling material. For example, to make a Santa Claus, you’ll need:
- A cardboard roll
- Cotton
- Red paperboard
- Glue
- Scissors
Use the red paperboard to wrap the outer half of the cylinder, creating Santa Claus’ clothes. You should also use this paperboard to create this character’s hat. To do so, all you need to do is create a cone and put a small cotton ball on its tip.
At the upper part of the cylinder — the part with no decorations — add some cotton, recreating Santa Claus’ white beard and hair. Leave a space in the middle of the cylinder so that you can draw his nose and eyes. Our Santa Claus is ready!
In the same way, you can create other types of characters that show their own characteristics. All you’ll need is your own imagination.
Christmas bubbles to decorate the tree
As we said before, one of the hallmarks of Christmas are trees. These trees are set up in homes and streets, fully decorated with several colors and forms.
Undoubtedly, the most important complement of a Christmas tree is its ornaments. So, here we show you how to create Christmas ball ornaments to decorate the tree. You will need:
- Paperboard
- EVA foam
- Pencil
- Scissors
- Ribbon
The first step will be to draw, or trace, the ornament’s form on the paperboard of your choice. Once the shape has been cut out, the next step will be to decorate it. You can use EVA foam or any other similar material that you have at home. For the decoration, you can make snowflakes, stars or presents in whichever way you prefer,
Lastly, make a tiny hole in the upper part of the ornament so that the ribbon can get through it and the ornament can hang from the Christmas tree.
A Christmas tree
Most children love to help put up Christmas decorations — especially tree decorations. For that reason, they’ll love to create their own Christmas tree in a very simple way. To do so, they’ll need the following materials:
- Three ice cream sticks
- Colored buttons of the same size
- A brown paperboard
The first step will be to paint the three ice cream sticks green. Once painted, glue them together so that they form a triangle — simulating the form of a Christmas tree.
The buttons should be placed on the sticks, giving them a nice touch. If you don’t have that many buttons of different colors, you can use small circles made out of paperboard.
Lastly, since every tree needs its base, cut out a small rectangle from the brown paperboard and glue it at the back of the horizontal ice cream stick.
Santa Claus’ reindeer, one of the best Christmas crafts
To create a Santa Claus’ reindeer you’ll need the following materials:
- A plastic plate
- Brown paperboard
- Brown paint in acrylic
- Two ice cream sticks
- Two googly eyes
- A red pom-pom
The first step will be to paint the plastic plate brown. You should paint the part with the base, that is, the part that rests at the table and not the part on which you put the food. Once painted, the next step will be to glue the eyes and red pom-pom, which will be the nose.
With brown paperboard, you should create two tiny ears that will be set at the sides of the plate. Lastly, two ice-cream sticks, also painted brown, should be placed on top of the ears, simulating the reindeer’s antlers.
All cited sources were thoroughly reviewed by our team to ensure their quality, reliability, currency, and validity. The bibliography of this article was considered reliable and of academic or scientific accuracy.
- 3grafik Design (2021). Esferas navideñas, manualidades, foamy, crafts, diy, manualidades fáciles, navidad. [YouTube]. https://www.youtube.com/watch?v=ViBwYbiKKOY&ab_channel=3grafikDesign
- Arte de papel. (2021). Cómo hacer un copo de nieve de papel en 5 minutos. [YouTube]. https://www.youtube.com/watch?v=1EsgAzAss40&ab_channel=artedepapel
- Art & Crafts. (2019). Como hacer un arbol de Navidad de papel – Christmas Tree Origami. [YouTube]. https://www.youtube.com/watch?v=qJM7wy_-YJI&ab_channel=Art%26Crafts
- Art & Crafts. (2020). Cómo hacer una estrella de papel para decoraciones de Navidad. [YouTube]. https://www.youtube.com/watch?v=tjkF22ebx7Y&ab_channel=Art%26Crafts
- Crafty DIY Reciclaje. (2022). DIY Lazo de goma Eva. Manualidades para Navidad. Decoraciones para el árbol de navidad. Christmas. [YouTube]. https://www.youtube.com/watch?v=tyzTnIAw_6s&ab_channel=CraftyDIYReciclaje
- Diviértete con Lluna. (2020). Árbol de navidad con palitos de helado. [YouTube]. https://www.youtube.com/watch?v=ECQNt6QeABQ&ab_channel=Divi%C3%A9rteteconLluna
- Ideas Fantásticas. (2020). Angelitos navideños. [YouTube]. https://www.youtube.com/watch?v=u-iundv4x44&ab_channel=IdeasFant%C3%A1sticas
- Hora de DIY. (2015). Decoración de navidad: Papa Noël de cartón. [YouTube]. https://www.youtube.com/watch?v=NRTEfMBsUS0&ab_channel=HoradeDIY%2aHoyNoHayCole%2a
- Kena Revista. (2018). Tutorial: Plato con forma de reno. [YouTube]. https://www.youtube.com/watch?v=LMe11JeEbsc&ab_channel=KENARevista
- Mundo a Party. (2016). Bolas de Papel #2. Adorno de Navidad. [YouTube]. https://www.youtube.com/watch?v=jH3F2FhVAR8&ab_channel=MundoaParty
This text is provided for informational purposes only and does not replace consultation with a professional. If in doubt, consult your specialist.