3 Paper Mache Crafts for Children
If you love works made with your own hands and share this passion with the little ones in your house, you’re in luck. In the following article, we’ll show you 3 paper mache crafts for children that will make any future artist fall in love.
With each step, you’ll enhance the imagination of your children and the bonds of your family. Do you want to learn how to make a solar system, a candle holder, or a beautiful hat? Keep reading.
How to make paper mache at home
As well established by research carried out at the Universidad Santo Tomás, Colombia, paper mache crafts are an excellent way to teach the little ones in the house to reuse this material.
By building the different objects that are used for personal use or to decorate the home, it’s possible to develop imagination, creativity, and respect for mother nature.
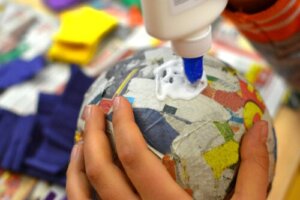
Therefore, below, we’ll teach you how to make your own paper mache with elements that you’re sure to have around the house. You’ll only need sheets of newspaper, stationery, or old magazines, as well as chalk, water, and glue. Check out the step-by-step instructions!
- To start, cut the papers into small pieces.
- Then, place them in a container with water and glue until they’re well mixed.
- Once the mixture is homogeneous, add chalk and stir the mixture slowly again.
Although there are many different ways to make paper mache (such as with flour instead of chalk), the truth is that this is the right way to achieve a more precise result. Then, you only need to paint it the color of your choice once the preparation is dry (1 hour later).
Paper mache crafts for children
Once you have your own homemade paper mache, it’s the perfect time to bring your creations to life.
Next, we’ll offer you several ideas that will captivate you thanks to the fact that they’re original, creative, and didactic. Without a doubt, they’re perfect to make with the little ones in your house.
1. The solar system, one of the most beautiful paper mache crafts for children
Learning about the planets will never be as much fun as with this craft made from recyclable material. Also, if your little one has to do a project for school about the solar system, this craft will shine for its originality.
Best of all? They can decorate their room with the results and bring a unique and magical touch to their personal space.
Materials
- Paper mache
- An old umbrella
- Balloons
- Tempera paints
- Brushes
Step-by-step instructions
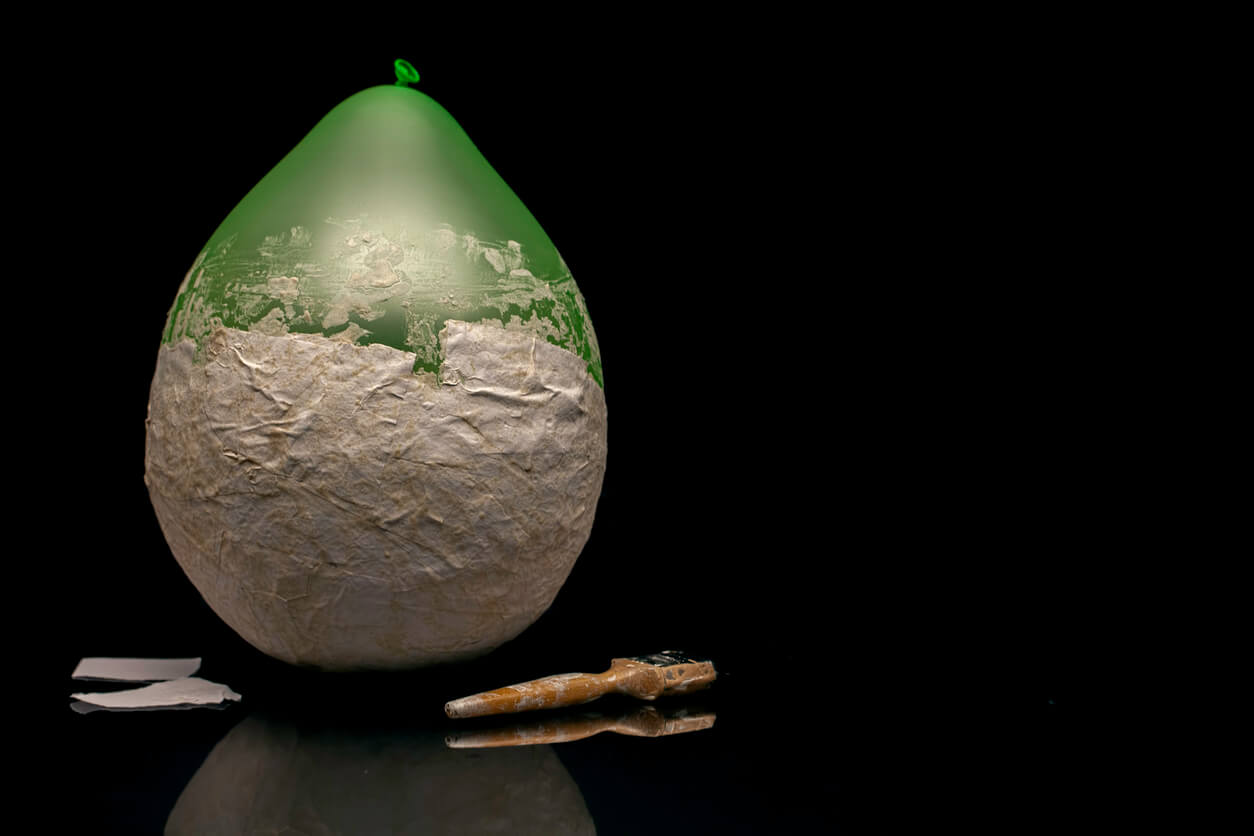
- To get started, blow up eight different-sized balloons and glue the paper mache over them. In this step, it’s important to apply several layers until it’s perfectly homogeneous. Then let it dry overnight.
- Once the paper is dry, paint each balloon the color of each planet.
- Finally, tie string to the knotted end of each balloon, strip the fabric from an old umbrella, and tie each planet onto one of the ribs.
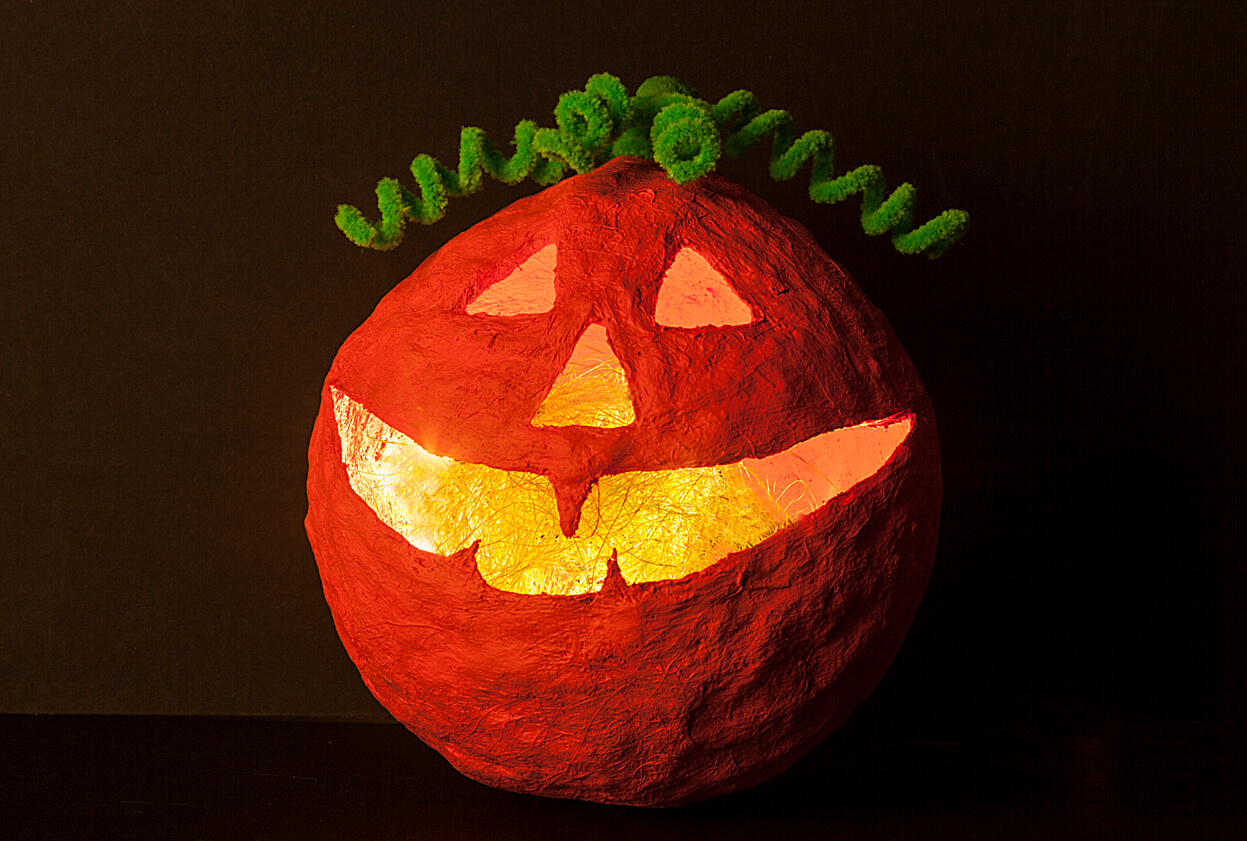
2. A pumpkin Candle Holder
What’s better than providing peace in your child’s room with a candle holder in the shape of a pumpkin? Without a doubt, this is a craft that won’t only stand out on Halloween, but will also delight your little one the rest of the year.
And a curious fact: It will provide a touch of tranquility and enhance the desire to read in their room. With its dim light, stories will come to life.
Materials
- Paper mache
- Balloon
- Brush
- Orange tempera paint
- Scissors or a cutter
- A plastic cup
Step-by-step instructions
- Put 3 or 4 layers of paper mache on the balloon.
- Then, with the help of a cutter or scissors, cut the upper part of the balloon and then cut several pieces to make the eyes and mouth.
- Paint the surface with orange tempera paint to give the pumpkin that distinctive touch and let it dry.
- Finally, place a small lamp or a flashlight inside and… Done!
3. A rabbit hat
Little ones love animals. Therefore, if you want to have an original and fun hat, get ready to make this craft. Of course, we recommend you paint the accessory beforehand in a place with good ventilation. Take note!
Materials
- Paper mache
- Posterboard
- Pencil
- A pair of scissors
- Glue
- Brush
- Acrylic paint
- Acrylic varnish
Step-by-step instructions
- Draw and cut two ears on the cardboard and connect them with the glue by means of small bands. Try shaping them with two layers of paper mache and let them dry.
- Once dry, paint the hat in the color of your choice and do the same inside the ears (preferably in a lighter shade). Then let it dry again.
- To provide better results, apply two coats of varnish.
- Finally, to adjust the hat, thread a ribbon around the sides and tie it under your little one’s chin.
Enjoy the best paper mache crafts for children as a family
One of the best ways to express feelings as a family is to share an afternoon of crafts together. For this reason, we recommend you save space in your free time to carry out this activity that is so beneficial and reinforces emotional bonds and learning.
And how about you? Are you reading to start creating today? What do you think of these original works? Let us know in the comments!
If you love works made with your own hands and share this passion with the little ones in your house, you’re in luck. In the following article, we’ll show you 3 paper mache crafts for children that will make any future artist fall in love.
With each step, you’ll enhance the imagination of your children and the bonds of your family. Do you want to learn how to make a solar system, a candle holder, or a beautiful hat? Keep reading.
How to make paper mache at home
As well established by research carried out at the Universidad Santo Tomás, Colombia, paper mache crafts are an excellent way to teach the little ones in the house to reuse this material.
By building the different objects that are used for personal use or to decorate the home, it’s possible to develop imagination, creativity, and respect for mother nature.
Therefore, below, we’ll teach you how to make your own paper mache with elements that you’re sure to have around the house. You’ll only need sheets of newspaper, stationery, or old magazines, as well as chalk, water, and glue. Check out the step-by-step instructions!
- To start, cut the papers into small pieces.
- Then, place them in a container with water and glue until they’re well mixed.
- Once the mixture is homogeneous, add chalk and stir the mixture slowly again.
Although there are many different ways to make paper mache (such as with flour instead of chalk), the truth is that this is the right way to achieve a more precise result. Then, you only need to paint it the color of your choice once the preparation is dry (1 hour later).
Paper mache crafts for children
Once you have your own homemade paper mache, it’s the perfect time to bring your creations to life.
Next, we’ll offer you several ideas that will captivate you thanks to the fact that they’re original, creative, and didactic. Without a doubt, they’re perfect to make with the little ones in your house.
1. The solar system, one of the most beautiful paper mache crafts for children
Learning about the planets will never be as much fun as with this craft made from recyclable material. Also, if your little one has to do a project for school about the solar system, this craft will shine for its originality.
Best of all? They can decorate their room with the results and bring a unique and magical touch to their personal space.
Materials
- Paper mache
- An old umbrella
- Balloons
- Tempera paints
- Brushes
Step-by-step instructions
- To get started, blow up eight different-sized balloons and glue the paper mache over them. In this step, it’s important to apply several layers until it’s perfectly homogeneous. Then let it dry overnight.
- Once the paper is dry, paint each balloon the color of each planet.
- Finally, tie string to the knotted end of each balloon, strip the fabric from an old umbrella, and tie each planet onto one of the ribs.
2. A pumpkin Candle Holder
What’s better than providing peace in your child’s room with a candle holder in the shape of a pumpkin? Without a doubt, this is a craft that won’t only stand out on Halloween, but will also delight your little one the rest of the year.
And a curious fact: It will provide a touch of tranquility and enhance the desire to read in their room. With its dim light, stories will come to life.
Materials
- Paper mache
- Balloon
- Brush
- Orange tempera paint
- Scissors or a cutter
- A plastic cup
Step-by-step instructions
- Put 3 or 4 layers of paper mache on the balloon.
- Then, with the help of a cutter or scissors, cut the upper part of the balloon and then cut several pieces to make the eyes and mouth.
- Paint the surface with orange tempera paint to give the pumpkin that distinctive touch and let it dry.
- Finally, place a small lamp or a flashlight inside and… Done!
3. A rabbit hat
Little ones love animals. Therefore, if you want to have an original and fun hat, get ready to make this craft. Of course, we recommend you paint the accessory beforehand in a place with good ventilation. Take note!
Materials
- Paper mache
- Posterboard
- Pencil
- A pair of scissors
- Glue
- Brush
- Acrylic paint
- Acrylic varnish
Step-by-step instructions
- Draw and cut two ears on the cardboard and connect them with the glue by means of small bands. Try shaping them with two layers of paper mache and let them dry.
- Once dry, paint the hat in the color of your choice and do the same inside the ears (preferably in a lighter shade). Then let it dry again.
- To provide better results, apply two coats of varnish.
- Finally, to adjust the hat, thread a ribbon around the sides and tie it under your little one’s chin.
Enjoy the best paper mache crafts for children as a family
One of the best ways to express feelings as a family is to share an afternoon of crafts together. For this reason, we recommend you save space in your free time to carry out this activity that is so beneficial and reinforces emotional bonds and learning.
And how about you? Are you reading to start creating today? What do you think of these original works? Let us know in the comments!
All cited sources were thoroughly reviewed by our team to ensure their quality, reliability, currency, and validity. The bibliography of this article was considered reliable and of academic or scientific accuracy.
- Ruiz González, M. A. (2020). Elaboración papel maché: estrategia pedagógica para promover la educación ambiental y el emprendimiento escolar a través de la reutilización del papel en estudiantes del grado quinto del colegio la Salle de Bucaramanga. Recuperado de https://repository.usta.edu.co/handle/11634/29674
This text is provided for informational purposes only and does not replace consultation with a professional. If in doubt, consult your specialist.